扩展能力
以下为
工作台、智慧审批提供的一些扩展能力
一、工作台
1.1 微应用里打开微应用(页签)
const key = Date.now().toString() // 标签唯一判断之一
window.parent.postMessage(
  {
    type: 'active',
    data: {
      id: key,
      code: key,
      name: '微应用页签名称',
      url: `/hello/`,
      inner: true, // 内部打开
      cache: true,
    },
  },
  '*'
)| 参数 key | 说明 | - |
|---|---|---|
| avatar | 图标 | |
| cache | 是否缓存,不设置时,刷新会被清除 | |
| id | 可设置同样 key,则会覆盖原页签的微应用 |
1.2 从URL跳转工作台,并打开微应用(页签)
const service =
  process.env.NODE_ENV === 'development'
    ? process.env.SERVER_URL
    : location.origin
const workUrl = `${service}/workbench/`
const strObj = JSON.stringify({
  type: 'active',
  data: {
    name: '房源管理',
    url: `/park-space/area`,
    cache: true,
  },
})
const href = workUrl + `?postMessage=${encodeURIComponent(strObj)}`
location.href = href| URL 参数 key | 说明 | - |
|---|---|---|
| postMessage | 微应用参数 | 参数跟1.1一样(需转义后) |
| fullscreen | 微应用全屏 | true 或 1 为全屏(例: &fullscreen=1) |
| fullExit | 全屏是否可退出 | false 或 0 为禁止(例: &fullExit=0) |
| menuId | 菜单ID | 与 postMessage 中 2 选 1,先自行获取某个菜单的id,再跳转(不可固定,每个企业的menuId不一致) |
| moduleId | 模块ID | 切换指定模块 |
| portalSearch | 门户名称 | 根据门户名称显示门户 |
| title | 自定义浏览器标题 | |
| - |
打开指定模块 或 打开指定门户
/workbench?portalSearch=招商全景&moduleId=1643957814906241026例子:
const href = location.origin + `/workbench?portalSearch=招商全景&moduleId=1643957814906241026`
window.open(href)1.3 从URL跳转工作台,并打开指定内容(模块/门户/菜单)
/workbench?portalSearch=招商全景&moduleId=1643957814906241026例子:
const href = location.origin + `/workbench?portalSearch=招商全景&moduleId=1643957814906241026`
window.open(href)| 参数 | 说明 | - |
|---|---|---|
| moduleId | 菜单模块ID | |
| portalSearch | 门户名称里的关键词 | 如包含同个词,可能有多个门户 |
| menuId | 菜单ID | 先自行获取某个菜单的id,再跳转(不可固定,每个企业的menuId不一致) |
1.4 微应用里切换全屏(当前页签)
window.parent.postMessage(
  {
    module: 'config',
    data: {
      key: 'fullscreen', // 切换全屏
    },
  },
  '*'
)| 参数 | 说明 | - |
|---|---|---|
| key | 配置标识 | 目前支持 [fullscreen] |
| fullExit | 全屏是否可退出 | false 或 0 为禁止(例 fullExit: false) |
1.5 模块-微应用-半全屏(隐藏菜单/页签/重定向)
模块绑定的-微应用的url上、或者外链url上,存在 fullscreen=2,即可打开半全屏
例1:https://www.baidu.com/?fullscreen=2
例2:https://www.baidu.com/?a=1&fullscreen=notActive
例3:https://www.baidu.com/?fullscreen=redirect| 参数 | 说明 | - |
|---|---|---|
| fullscreen=2 | 半全屏,不显示左侧菜单 |
(例: ?fullscreen=2) 或者 &fullscreen=2) |
| fullscreen=notActive | 点击模块打开新窗口,不切换模块 |
(例: ?fullscreen=notActive) 或者 &fullscreen=notActive) |
| fullscreen=redirect | 点击模块时,重定向到目标链接,不切换模块 |
(例: ?fullscreen=redirect) 或者 &fullscreen=redirect) |
1.6 模块-隐藏浮层/隐藏侧边栏数据(部分项目)
① 模块下的某个二级菜单的外链url上,存在 menuDisplay=false,即隐藏二级菜单浮层
例:https://www.baidu.com/?menuDisplay=false| 参数 | 说明 | - |
|---|---|---|
| menuDisplay=false | 隐藏二级菜单浮层 | (例: ?menuDisplay=false) 或者 &menuDisplay=false) |
② 模块绑定的外链url上,存在 sidebarLeafHide=true,即隐藏侧边栏的子节点数据
例:https://www.baidu.com/?sidebarLeafHide=true| 参数 | 说明 | - |
|---|---|---|
| sidebarLeafHide=true | 隐藏侧边栏的子节点数据 |
(例: ?sidebarLeafHide=true) 或者 &sidebarLeafHide=true) |
| sidebarLeafHide=false | 显示侧边栏的子节点数据(写在应用外链里) |
(例: ?sidebarLeafHide=false) 或者 &sidebarLeafHide=false) |
| leafHide | 隐藏侧边栏的子节点数据(写在模块别名里) |
(例: leafHide) |
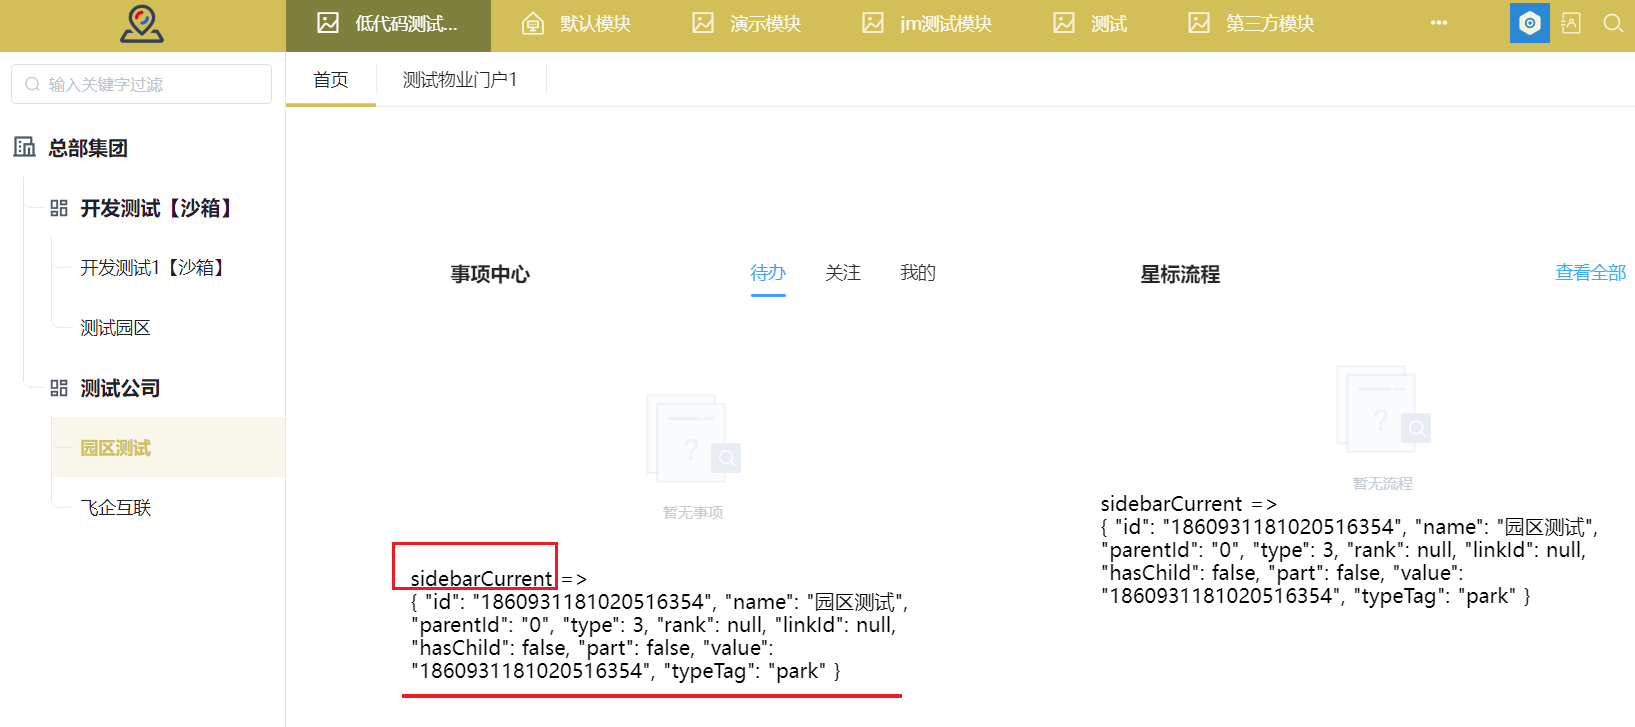
1.7 工作台-侧边栏数据(部分项目)
| 参数 | 说明 | - |
|---|---|---|
| name | 当前名称 | |
| value | 当前ID | 建议使用这个 |
| type | 节点类型 | |
| typeTag | 类型标识 |
// 枚举(type:typeTag)
{
  0: 'group', // 集团
  2: 'ent', // 运营企业
  3: 'park', // 园区
  4: 'project', // 项目
}
// 数据例子
{
    "id": "1860931181020516354",
    "name": "园区测试",
    "parentId": "0",
    "type": 3,
    "rank": null,
    "linkId": null,
    "hasChild": false,
    "part": false,
    "value": "1860931181020516354",
    "typeTag": "park"
}
① 微应用获取侧边栏数据的方式:
// 工作台发出的 postMessage
1.传递格式:(微应用首次加载时,传递于微应用)
{
    type: 'load',
    data: {
       ...,
       sidebarCurrent: { ... },
    },
}

2.传递格式:(侧边栏切换,传递于微应用)
{
    module: 'portal',
    type: 'sidebarCurrent',
    detail: { ... },
}接收事件,微应用接收工作台的postMessage
  window.addEventListener('message', this.message)
  所以接收时:
  message(event) {
    let { data } = event
    if (data.type === 'load') {
        // 1.TODO
        let sidebarNode = data?.data?.sidebarCurrent
        console.log('sidebarCurrent =>', sidebarNode)
    } else if (data.type === 'sidebarCurrent') {
        // 2.TODO
        let sidebarNode = data?.detail
        console.log('sidebarCurrent =>', sidebarNode)
    }
  }
// 也可以主动发"load",以便快速接收工作台的"load"
window.parent.postMessage(
{
type: 'load',
},
'*'
)② 门户组件获取侧边栏数据的方式:
props: {
  sidebarCurrent: {},
},
computed: {
  sidebarNode() {
    return this.sidebarCurrent || {}
  },
},
created() {
  console.log('sidebarCurrent =>', this.sidebarNode)
},
二、智慧审批
| 跳转地址 | 显示方式 | - |
|---|---|---|
/approve/matter/form |
表单 + 顶部事项页签 | |
/approve/form |
表单 |
2.1. 自动返回业务
跳到流程时,URL传参autoBack,url,流程送办后,会自动返回业务
const url = encodeURIComponent(window.location.href)
window.location.href = `/approve/form?flowId=xxxx` + `&url=${url}&autoBack=true`
2.2. 控制流程按钮
可传一些参数,控制按钮是否禁用,如驳回,退回等
- 需在业务代码里,使用
$emit
this.$emit('eventMessage', { key: 'RejectButton', value: false })| key | 按钮/事件 | 类型 |
|---|---|---|
| RejectButton | 驳回 | Boolean |
| ReturnButton | 退回 | Boolean |
| StagingButton | 暂存 | Boolean |
| ProcDefName | 自定义流程名称 | String |
2.3. 业务内嵌[流程中心]
前提:业务自行使用弹窗类/页面,内嵌访问表单流程
使用要求
- 1.需要接收/发送 message 【否则空白,无法访问】
- 2.页面,嵌入iframe
例子:
2.3.1 接收/发送 message
*如果工程里【mutations】已有 HANDLE_MESSAGE,直接在后面添加。(否则需要写全局的监听【下面的补充例子】)
HANDLE_MESSAGE: (state, event) => {
  // 解析message接收到的数据
  const data = event.data

  if (data.module) {
    switch (data.type) {
      case 'getToken':
        // 获取token
        if (typeof window !== 'undefined') {
          ;[...window.document.querySelectorAll('iframe')].forEach((o) => {
            o.contentWindow.postMessage(
              {
                module: 'auth',
                type: 'getToken',
                // 根据实际,修改获取token的方法
                detail: mutations.GET_TOKEN(state),
              },
              '*'
            )
          })
        }
        break
      case 'getUserInfo':
        // 获取userInfo
        if (typeof window !== 'undefined') {
          ;[...window.document.querySelectorAll('iframe')].forEach((o) => {
            o.contentWindow.postMessage(
              {
                module: 'auth',
                type: 'getUserInfo',
                // 根据实际,修改获取userInfo的方法
                detail: state.user_info,
              },
              '*'
            )
          })
        }
        break
    }
  }
},
补充例子(全局方法)
window.addEventListener('message', this.message)

message(event) {
  const data = event.data
  ......
  // todo
  // 与上面3.1的一致
}


beforeDestroy() {
  window.removeEventListener('message', this.message)
},
例子截图(3.1):
2.3.2 页面嵌入表单
<iframe :src="approveUrl" frameborder="0" style="height: calc(100vh - 180px); width: 100%;"></iframe>const service =
process.env.NODE_ENV === 'development'
? process.env.SERVER_URL
: location.origin
const url = `${service}/approve/form`
const strQuery = '?id=xxxxxxxxxxxxxxxxxx'
this.approveUrl = url + strQuery实现效果:
文档更新时间: 2025-03-24 14:37 作者:戴均豪


